Removing drawers from sliding rails is a relatively simple task, and it can be done with basic tools. Here's a step-by-step guide to help you remove drawers from sliding rails:
Tools and materials you'll need:
- Screwdriver (Phillips or flathead, depending on the type of screws used)
- A work surface or area to place the removed drawers
Step 1: Empty the Drawer Before you start, make sure the drawer is completely empty. Remove all items from it to make the process easier and avoid any accidents.
Step 2: Extend the Drawer Pull the drawer out as far as it will go without falling off the rails. This will give you better access to the screws or levers that secure the drawer to the rails.
Step 3: Locate the Retaining Mechanism There are typically two common types of mechanisms used to secure drawers to sliding rails:
a. Screws: Look for screws on each side of the drawer, often near the front or rear. These screws hold the drawer onto the rails.
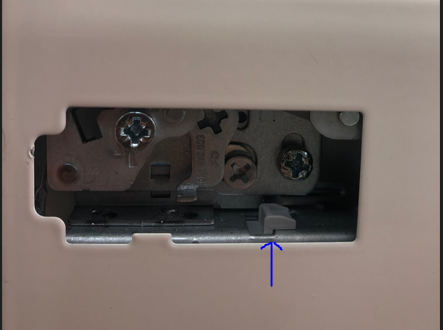
b. Levers or Release Tabs: Some drawers have levers or release tabs that need to be depressed or pulled to release the drawer from the rails. These may be located on the sides or underneath the drawer.
Step 4: Remove the Screws or Release the Levers/Tabs Depending on the type of retaining mechanism:
a. Screws: Use a screwdriver (or pliers if necessary) to remove the golden looking screws on each side of the drawer. Turn them counterclockwise until they are fully removed.
b. Levers or Release Tabs: If your drawer has release levers or tabs, push the clips from underneath back toward your, This action should disengage the drawer from the rails.
Step 5: Lift and Remove the Drawer With the screws removed or the release mechanism disengaged, carefully lift the front of the drawer slightly to release it from the rails. Then, pull the drawer straight out from the rails. You might need to wiggle it a bit if it's snug.
Step 6: Store or Work on the Drawer Once the drawer is removed, place it on a flat and stable surface. If you're removing the drawer for repair or maintenance, this is the time to make any necessary adjustments.
Step 7: Repeat for Additional Drawers (if applicable) If you have multiple drawers on the same set of rails, repeat the above steps for each drawer.
Step 8: Reassemble (if needed) If you needed to remove the drawers for maintenance or repair, reassemble them by reversing the steps and securing them back onto the sliding rails.
That's it! You've successfully removed a drawer from sliding rails. Remember to exercise caution while removing the drawer, especially if it's heavy or awkwardly shaped, and consider getting assistance if needed.
Pictures of tab draw mechanisms founded in zone vans, vans with screws will have a golden screw located underneath in the same location.